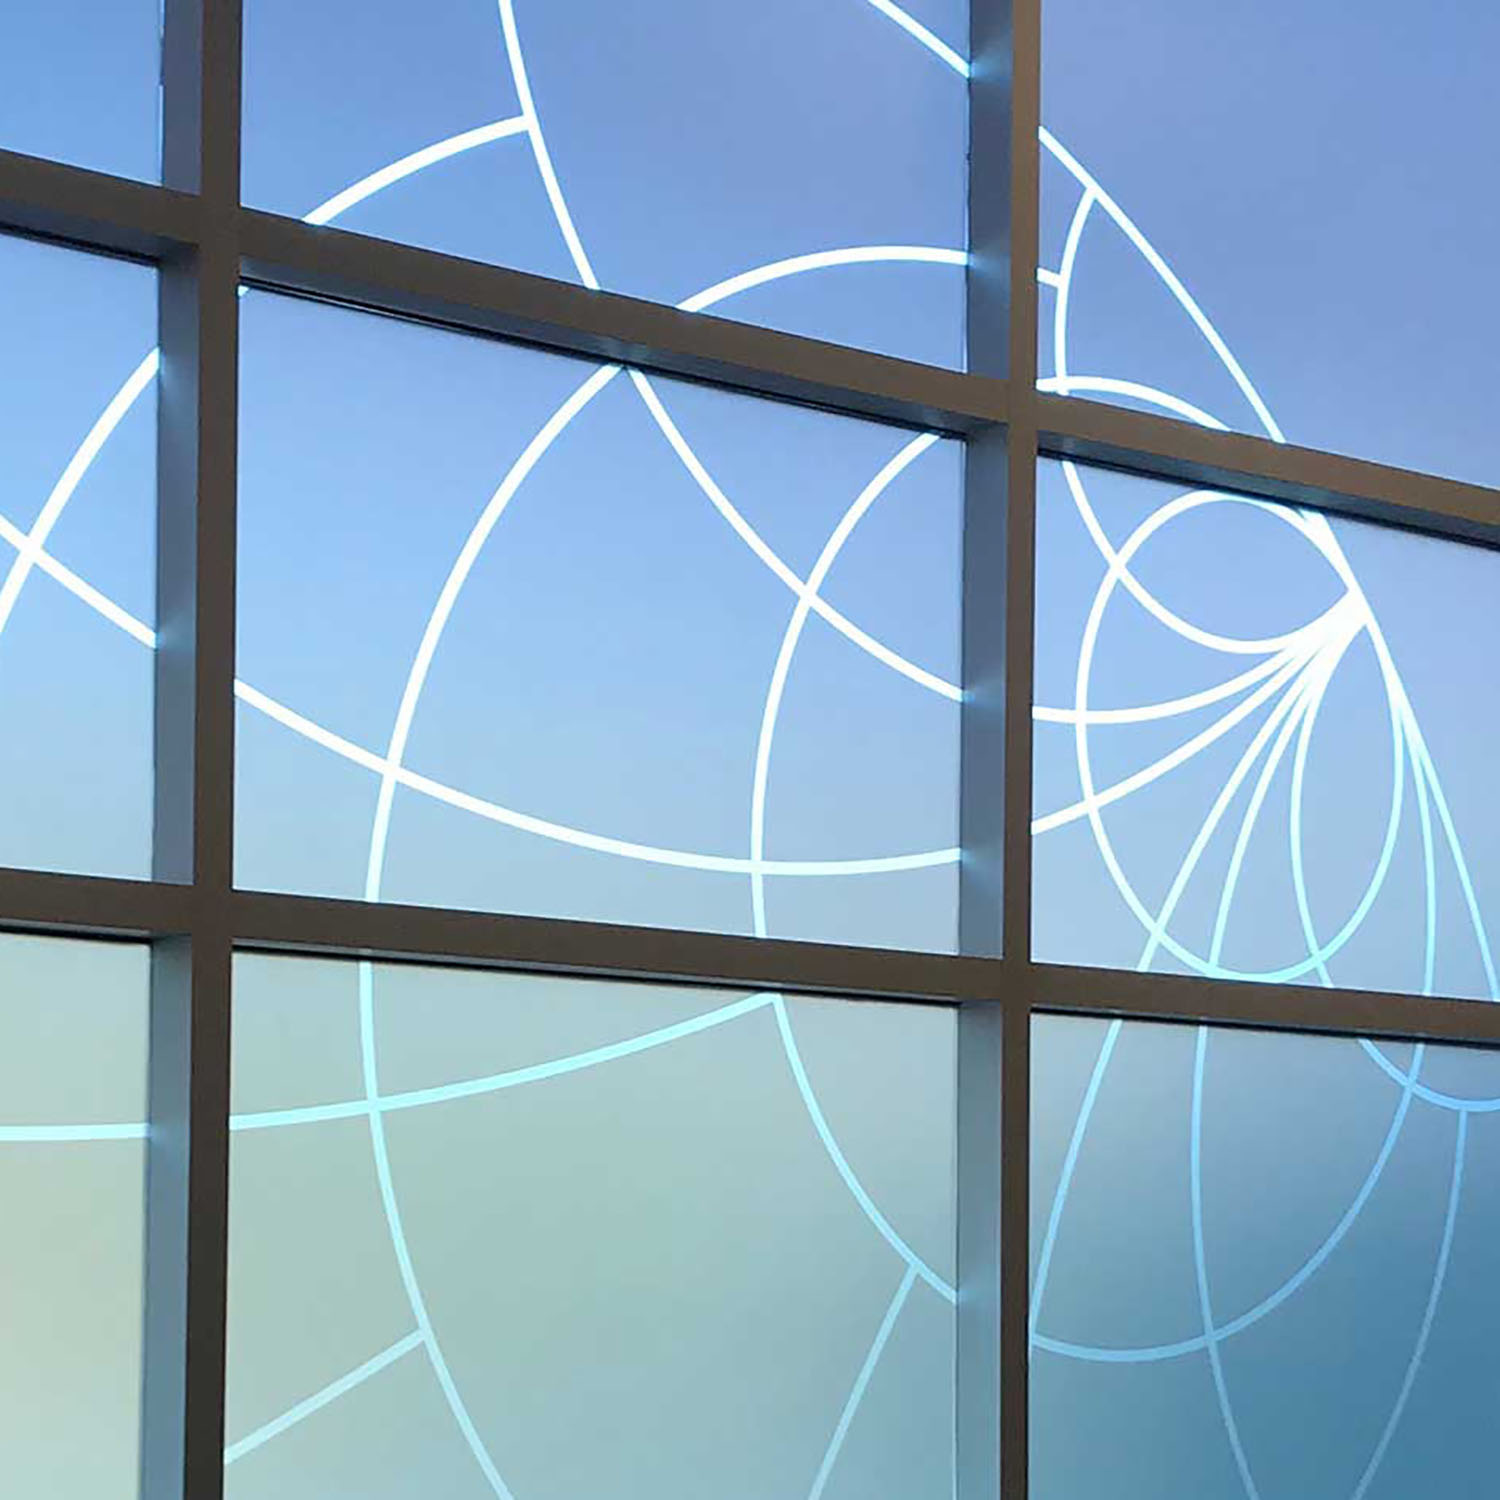
Printed window films can be an effective way to infuse color and design into otherwise plain glass windows, partitions, and doors. In addition to their aesthetic appeal, printed films can also be used to add privacy, control light, improve way-finding, and more. There are a few things to consider when specifying window film, and understanding some of these basics will make the process run smoothly and ensure an outstanding result.
Design & Artwork
We offer a variety of window film designs that are standards at VisualPro. These are a good “out-of-the-box” solution as they require little input to specify, and the available samples clearly demonstrate the end product.
(need link to brochure or catalog of stock patterns and designs)
Should you specify one of these you’ll only need to provide the required information listed here. For all other window film specifications, additional information may be required, as defined in the section Customizing Window Film below.
To see VisualPro artwork requirements click here.
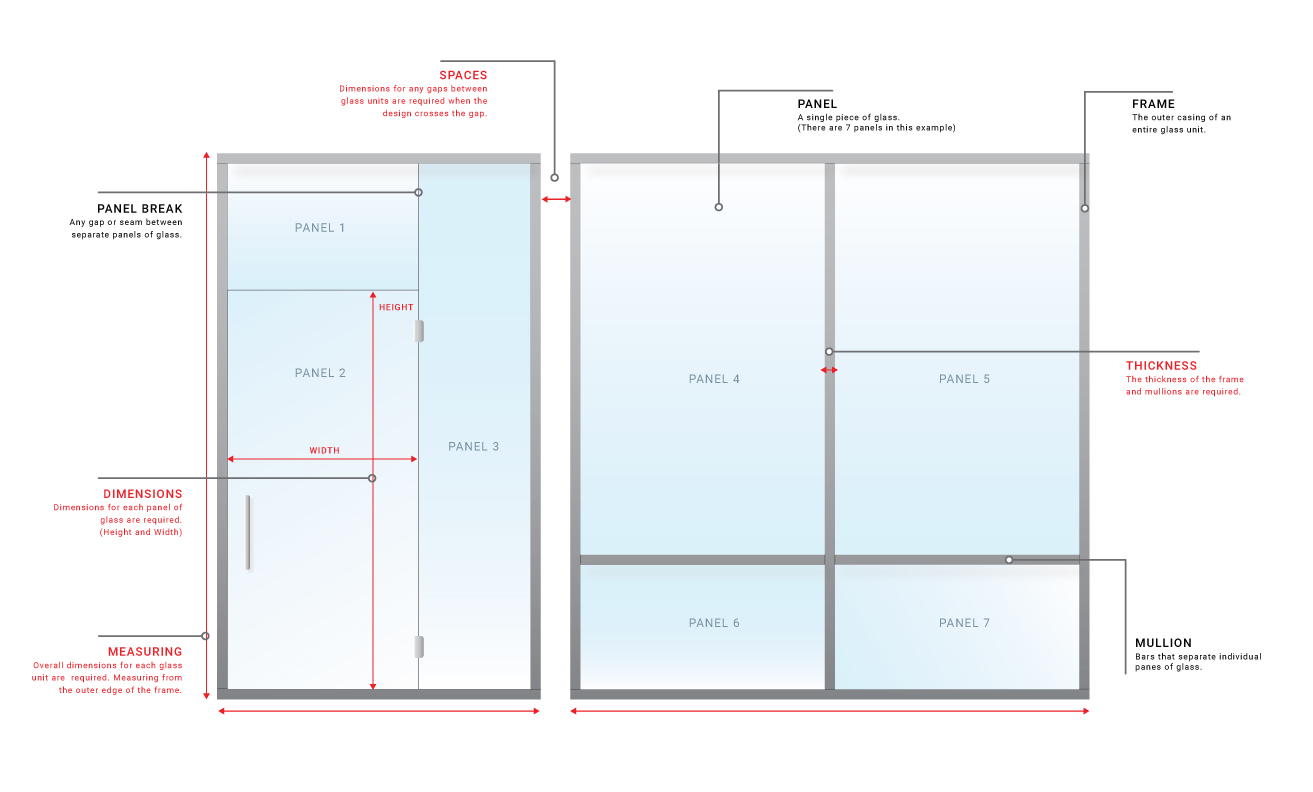
Dimensions
When specifying window film, two sets of dimensions are required. First, the overall height and width of each main glass unit (window, door, etc.) must be provided. In addition to this, however, dimensions for each individual pane of glass, as well as those of any mullions or dividers must also be provided. These are critical to ensure that the finished film will align continuously across the full section of glass.
Note: Each pane of glass will be printed as a separate window film. These include 2” of bleed and must be trimmed to fit by the installer. The material is available up to 61″ in width, so for very wide glass panels, a seam might be necessary. See the section Measuring for Window Film below for more details.
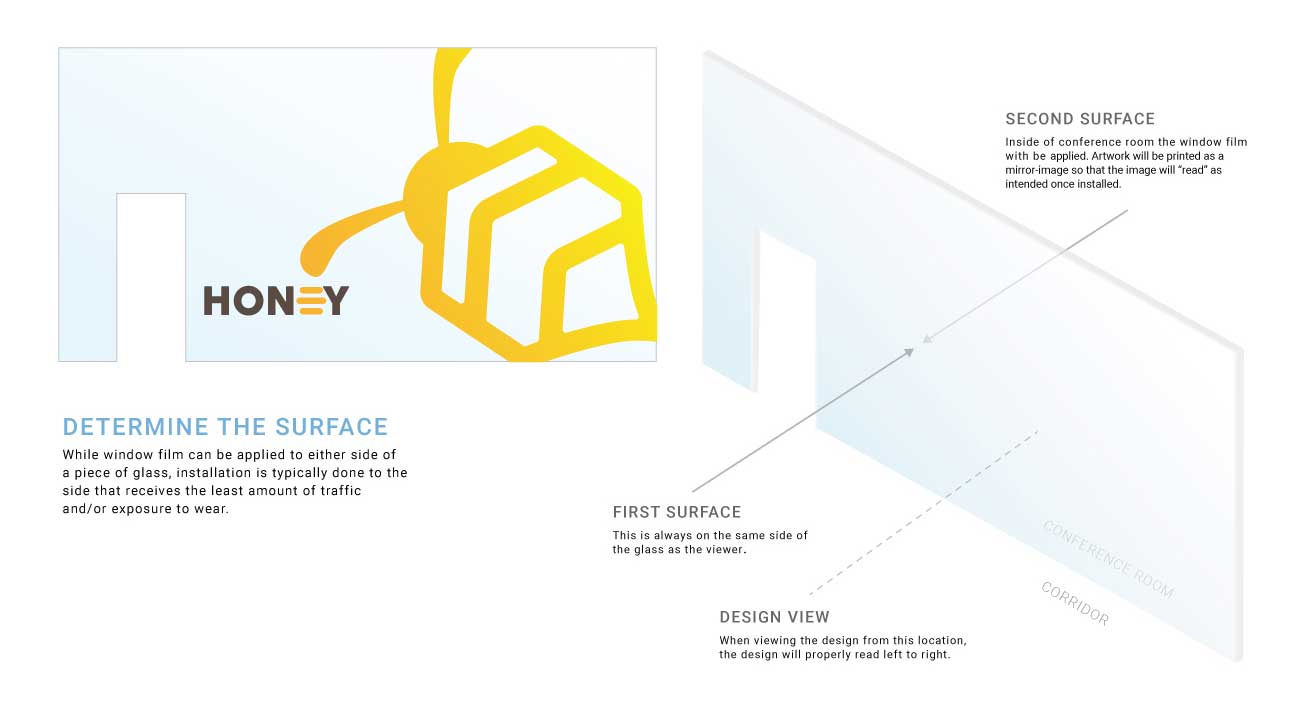
First Surface vs Second Surface
While window film can be applied to either side of a piece of glass, installation is typically done to the side that receives the least amount of traffic and/or exposure to wear. Establishing this surface early on is critical as it dictates how the print file must be created. Please refer to the section First Surface vs. Second Surface below for more details.
Customizing Window Film
If you choose to customize any aspect of a window film Design Standard or if you would like to produce a different design or piece of artwork as window film, some additional information may be necessary, depending on the result you wish to achieve. Understanding the following options and their nuances will help you provide that information efficiently and effectively.
Ink Combinations
There are various ways that white and color Inks can be combined, and each combination will yield a different effect. These combinations are:
- Color Ink Only – Color inks are inherently frosted in appearance, allowing diffused light to pass through. Color inks can also be used to create a neutral, frosted glass effect.
- White Ink Only – White inks are more opaque than color inks and also appear frosted in nature.
- Color + White Inks – White inks can be used in combination with color inks for both aesthetics and to add opacity to the colors. This can be a single layer of color backed by a single layer of white (in which case the color is only viewable on one side of the glass), or a layer of white sandwiched between two layers of color (in which case the colors are viewable on both sides of the glass).
Opacity
The Opacity of a print on window film is the degree to which the ink completely blocks out light. A high-opacity print allows very little light to pass through, while a low-opacity one is very transparent, and allows considerable light to pass through.
White ink is inherently very opaque. Printing heavy coverage of wcxhite ink yields a high opacity print while printing a very light screen of white yields a low opacity print. White ink is ideal for controlling opacity. Since white Ink prints are more opaque than expected, for best results when customizing we recommend erring on the lighter side.
Color inks are inherently translucent (though darker colors are by nature slightly more opaque and lighter colors are slightly less so). This translucency cannot be controlled. For example, a true, bright red has a bit of opacity to it (because it requires a fair amount of ink to print). By printing less ink, the result is not a lower opacity bright red, but rather a pink color that is the same opacity as the red. The only way to control the opacity of this red is to first print a base of white ink at your desired opacity.
Keep this in mind when requesting colors on window film at certain opacities. We can only control the opacities of color on window film by adding White ink.
Even at 100% opacity, white ink will not completely block out all light. This is especially important when printing text on film where the image is viewable from both sides. It is not recommended to try to print text that is readable from both sides, as the “backward” text from the other side of the film will be visible.
Gradients
A Gradient is a print that starts as one color or opacity and fades to a different color or opacity.
Gradients of white ink will always fade from one opacity to another opacity (as white ink is only one color).
Gradients of color Inks will always allow light to pass through unless backed by white ink (as the opacity of color inks cannot be controlled).
Gradients that combine both white color inks are possible, but not when fading to clear film (i.e. a gradient that goes from blue to clear while also going from 75% white to clear). White & color inks graduate at different rates, and it is nearly impossible to align them in perfect registration.
In a gradient, the transition from white ink to unprinted clear film can be noticeable, though subtle. Unless necessary, we recommend a gradient starts at no heavier than about 75% white and transitions to no less than 5% white.
Measurements
Although each installation is unique, there are some basic measurements that are almost always required for successful window film applications. Providing accurate dimensions for these will facilitate the ordering process[production] and greatly improve the end result.
What to Measure
Why this matters
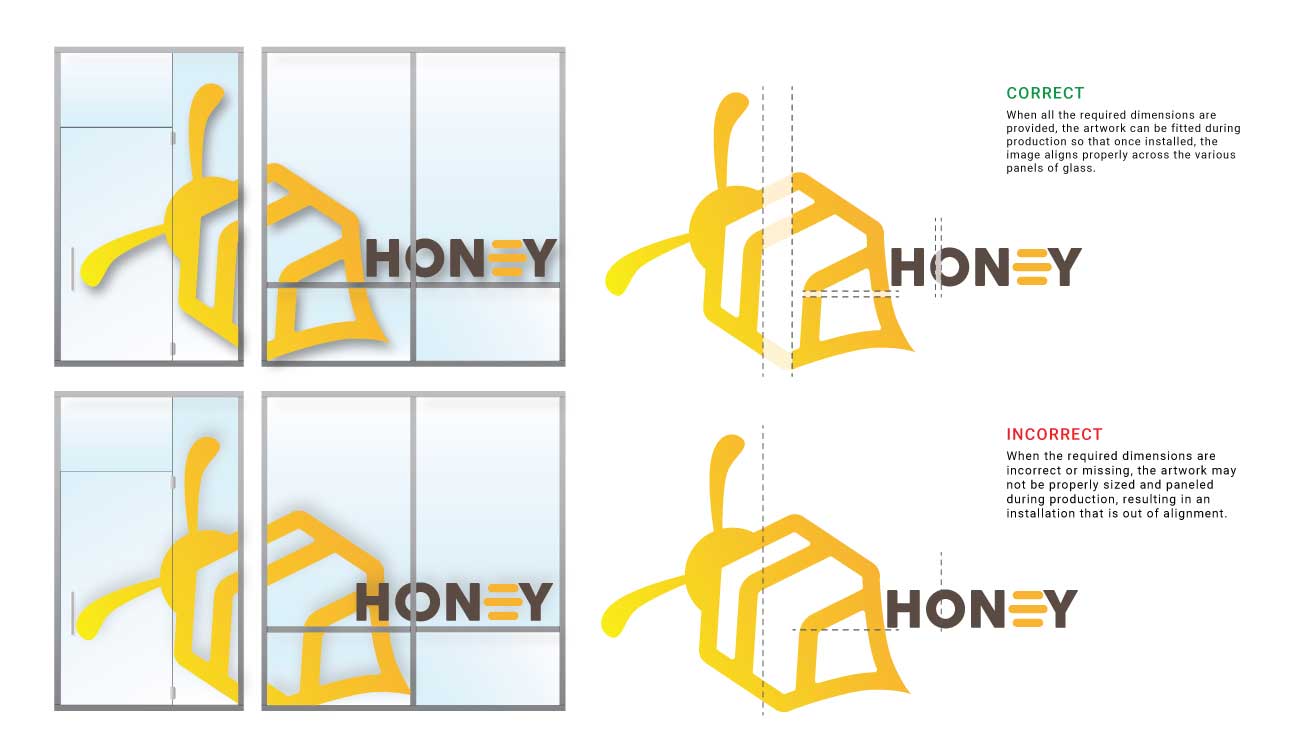
CORRECT
When all the required dimensions are provided, the artwork can be fitted during production so that once installed, the image aligns properly across the various panels of glass.
INCORRECT
When the required dimensions are incorrect or missing, the artwork may not be properly sized and paneled during production, resulting in an installation that is out of alignment.
First Surface vs. Second Surface
Window film may be applied to either side of a pane of glass, and this is typically determined by which side will receive less exposure to physical contact (for the longevity of the product).
Depending on which side, or Surface, of the glass is chosen, the artwork may need to be printed as a mirror image so that the image will “read” as intended once installed. It is necessary to determine this surface prior to the production of a Strike-Off, to ensure a proper installation.
Determine the surface
There are 2 things we need to know in order to establish the correct surface:
- Where is the viewer in relation to the glass?
-
- It’s critical to establish the location from which you’re viewing the finished design in its normal left-to-right orientation. Since First Surface is always on the same side of the glass as the viewer, we need to know the name of that location.
- For example, if the glass separates a Corridor and a Conference Room, and the viewer is in the Corridor, you would indicate “The first Surface from Corridor Side”.
- When viewing the glass is the film to be on the same side as you or on the opposite?
-
- Same Side = First Surface
- Other Side = Second Surface
The VisualPro team is ready to help to transform your design dreams into reality. You can contact us today for a free consultation, and we’ll help you get started. Or you can give us a call at 707-755-7337 and ask for the VisualPro team.